Save Sitecore Media Item to Disk file

Once we required to convert the Sitecore Media Item to a disk file (Save media item as a physical file on server). Sitecore does not provide any API to do this directly.

Below is the code to do it, thought to post it if can help others..
    string mediaItemPath = "/sitecore/media library/Images/myimage";
    string diskFolderPath = @"D:\Sitecore-Media\";

    MediaItem mediaItem = (MediaItem)Sitecore.Context.Database.GetItem(mediaItemPath);
    ConvertMediaItemToFile(mediaItem, diskFolderPath);


    public static void ConvertMediaItemToFile(MediaItem mediaItem, string folderName)
    {
        if (mediaItem.InnerItem["file path"].Length > 0)
            return;

        string fileName = folderName + mediaItem.Name + "." + mediaItem.Extension;

        var blobField = mediaItem.InnerItem.Fields["blob"];
        Stream stream = blobField.GetBlobStream();
        if (stream == null)
        {
            return;
        }

        string relativePath = Sitecore.IO.FileUtil.UnmapPath(fileName);
        try
        {
            SaveToFile(stream, fileName);
            stream.Flush();
            stream.Close();
        }
        catch (Exception ex)
        {
            Log.Error(string.Format("Cannot convert BLOB stream of '{0}' media item to '{1}' file", mediaItem.MediaPath, relativePath));
        }
    }

    private static void SaveToFile(Stream stream, string fileName)
    {
        byte[] buffer = new byte[8192];
        using (FileStream fs = File.Create(fileName))
        {
            int length;
            do
            {
                length = stream.Read(buffer, 0, buffer.Length);
                fs.Write(buffer, 0, length);
            }
            while (length > 0);

            fs.Flush();
            fs.Close();
        }
    }


Sitecore media and browser cache

Have you ever faced issues like your media items are not getting reflected to your page or you are still referring to older media files after media publish? Or your media files are not getting cached when accessing through revere proxy? Or your media files are not getting cached on browser level? Here is the solution in Sitecore itself, that is using Media Response Cacheability.

Media response cacheability is served using cache-control header, read more on topic 14.9 regarding cache-control header.

In web.config, you can define media response cacheability options in settings section like below:
    <!--  MEDIA RESPONSE - CACHEABILITY
    The HttpCacheability is used to set media response headers.
    Possible values: NoCache, Private, Public, Server, ServerAndNoCache, ServerAndPrivate
    Default value: public-->

    <setting name="MediaResponse.Cacheability" value="public" />

Here are six different settings to define media response headers, using which Sitecore manages media on client or browser level caching:


Media Cacheability Option Description
NoCache Browser cache is not created while using this option, so, every time media is served from server to device. This is not a good idea, when you want to improve performance by serving media files faster. This will slow down page speed.
Private This option allows browsers to store media cache. But, the response is cacheable only on the client and not by shared (proxy server) caches. Suppose, the ISP is having a invisible proxy between user and internet, then the user can not get benefit of media caching.
Public On step ahead than Private, using this option, response is cacheable by clients and shared (proxy) caches. So, anybody can use its caching mechanism. This option is mostly preferred to get optimum performance gain.
Server The response is cached only at the origin server. Similar to the NoCache option. Clients receive a Cache-Control: no-cache directive but the document is cached on the origin server. Equivalent to ServerAndNoCache.
ServerAndNoCache Applies the settings of both Server and NoCache to indicate that the content is cached at the server but all others are explicitly denied the ability to cache the response.
ServerAndPrivate Indicates that the response is cached at the server and at the client but nowhere else. Proxy servers are not allowed to cache the response.


Let's go back to solve these problems.
1. Media files are not getting cached?
    - Use public or private depending on your need, described above.

2. Caching is on from Sitecore, still cache is not getting generated on device or browser.
    - Chances are use of any proxy before reaching to you. Check, your settings might be set as Private. Set it as Public.

Sitecore Intelligent Publish - The most optimized Approach


Sitecore publishing becomes headache for us when we have any of below situations:

- Sitecore application slows down due to frequent publication or frequent cache clearing.
- Publishing being queued for users due to slow & repetitive publishing.
- It is becoming difficult to monitor your publishing and related consequences.

There are FIVE thumb rules to get optimized publishing, which solves all above problems.
  • Stop frequent publishing
  • Publish only those items which are actually modified
  • Optimize publishing operations
  • Distribute load of publishing
  • Cache Tuning

Below is an approach described theoretically. I'll be posting its practical implementation soon!!

1. Use Intelligent Publish

Smart Publish and Republish both have their own pros & cons. Can't we produce an intelligent publish mechanism which can join all pros of both approaches and without getting their cons? This approach I named Intelligent Publish.

Smart Publish checks Publish Status of individual at time of publish, which play a bigger role in slowing down publishing. In it, only modified items will get published. In Intelligent Publish, we will list down which items to be published and then send these items to publishing . So, this will save much time at time of publish. Also, these items will be sent as Republish.

Intelligent Publish shares all pros of both approach without sharing cons. But yes, it is not easy to implement this approach. Below table shows difference between them.

Actions Republish Smart Publish Intelligent Publish
Operations on UI Site
1. Collect items Collect items Collect items Collect items with references
2. Filter Items NA NA Filter items which are to be published or excludes all items already published
Actual Publish Started and added to Publish Queue
3. Invoke Publish Invoke publish for all items Invoke publish for all items Invoke publish for all filtered items in Step - 2
4. Check Publish Status NA Yes NA (Already done in Step - 2)
5. Publish items Publishes all items Publish only modified items checked in Step - 4. Publishes only filtered items in Step - 2.

2. Use Publish Basket

It goes worst when user needs to select items and publish them one-by-one. Don't you think it increases client clicks and wastes time and frequency of publishing? Smart publish the site is also not a solution here.

To prevent this situations, we can allow users to use Publish Basket. Users can add n number of items in basket and send them to publish in one go. We might need to use an external DB to store basket items and send to publish. See below snap, shows mockup for Publish Basket.

Sitecore Publish Basket - Sitecore Tactics

3. Publish items with reference items

We can allow referenced items to get publish along with the selected publishable item. The references can be all referenced media as well as all items which are selected in fields like Multilist, subtree, etc.

This will reduce frequency of publishing, that will reduce frequency of clearing HTML cache.

4. Schedule Publish

Suppose, your client has to do publish after few hours for many items. Is it good that your client will remember the exact timings of publishing, say publishing at mid-night?

Now you feel, how important role the Scheduled Publish can play with Publish Basket functionality. We can allow user to do publish at specific date and specific time. See below snap, shows mockup for scheduling items.

Sitecore Scheduled Publish - Sitecore Tactics

5. Use Separate Publish Instance

Using separate publish instance can give many benefits if we are getting slowness on CM server at time of publish. In this case, all load of heavy publish will be taken by PI and CM can work without worrying that much about Publishing going on.

Below snap shows how Publishing will work with a separate Publish Instance.


Read How to setup Sitecore Publish Instance.

6. Use Multiple Publish Instances

Are your clients complain about queue stuck up while publishing? You may have faced issues like many users have set publishing so important publishing gets queued for a long period of time.

To prevent this kind of situation, we can share load of publishing by having multiple publish instances. We have successfully implemented multiple PI and working great without any problems since July, 2012.

Read more about Multiple Publish Instances or Parallel Publish in Sitecore.

Must read posts for Sitecore Publish

- Sitecore Publishing Facts
- Setup Publish Instance
- Sitecore Parallel Publishing using Multiple Publish Instances

Some Sitecore Publishing Findings

Well, I do not want to waste your time in explaining how Sitecore publishing works, there are many blogs explaining What is publishing, publishing modes, ways to publish content, versions, target databases, etc. So, I would like to share some hidden secrets about Sitecore Publishing Mechanism, which I learn while exploring it.


Below are the questions mostly Sitecore developers always eager to know:

Why my publish fails or when publish:fail event is called?

While publishing any runtime error occurs like SQL Connectivity loss/Timeout, any SQL Exception, etc. the publish fails. The items already published, cannot be rollback and the items pending to publish needs to be published again. Means, Sitecore publishing does not maintain Transactions.

Check the publishing code from Sitecore.Publishing.Publisher.Publish. The code also contains comments which can explain how publishing works.
public virtual void Publish()
{
    object obj3;
    Monitor.Enter(obj3 = this.GetPublishLock()); // Locks the publishing. That's why publishing is a sequential process.
    try
    {
        using (new SecurityDisabler())
        {
            this.AssertState();
            this.NotifyBegin(); // Raises publish:begin event
            this.PerformPublish(); // Sends the current publish job to start publish
            this.NotifyEnd(); // Raises publish:end event
            this.UpdateLastPublish(); // Updates last publish date in source database
        }
    }
    catch (Exception exception)
    {
        // This function raises publish:fail event.
        this.NotifyFailure(exception);
        throw;
    }
    finally
    {
        Monitor.Exit(obj3);
    }
}

Why my publish expires or when publish:expire event is called?

You might get below configuration setting in web.config file.
     <setting name="Publishing.TimeBeforeStatusExpires" value="02:00:00"/>
If your publishing is taking more than time specified in the setting, the publishing job expires. Here, if your publishing job is taking more than 2 hours, it will get expired. Increasing its value to 5 or 10 hours can solve your problem of expiration if you have to publish thousands of items or heavy media items in one go.

Why my items not getting published?

There can be many reasons behind it:
  • The user publishing the item has not having its rights. Giving rights to the user can do publish.
  • When default/anonymous user's access rights are removed for the item or its parent. Giving rights to the user can do publish.
  • If still you cant find out issue, enable event timing level to high. Now, check logs on publish instance while doing publishing, this will log all events in details and help to identify the cause of problem in publish.
       <events timingLevel="high">
    
  • If you have set a publish instance, check Publish Instance is running or not. It should be up & running.
  • If it is not above case, and still publish not happening, then you need to enable eventqueue on CM as well as PI.
  • If first publish is going on after restart, it can be slow too. It needs to generate more cache and that's why it taking more time. Once cache generated, it will start publishing normally.

What are the reasons for slower publishing?


  • Publishing is a slower process by default as per its process. It requires a lot of processing time, so it consumes lots of CPU resources on Publish Instance. It needs constant updates on web database, so while publishing many insert, update or delete queries are executed. Many caches are cleared.
  • You are publishing many as well as heavy items (items with more size like media files)
  • Have you recently updates Access Viewer to give rights to any Role?
  • Have you checked your target database server is performing well? Checked its IOPS(Input/Output Operations Per Second)?
  • Many publishing or other jobs are in queue. Check below setting in your web.config on your PI.
    <setting name="MaxWorkerThreads" value="20" />
    
    This config determines how many worker threads can be running simultaneously. If your publishing or any other jobs have occupied these (in the example 20) threads, next queued job/publishing has to wait till it gets a free thread. Also, in this situation, your publishing might get stuck.

    You can increase its value as per need. Also remember, greater value can allow more jobs to execute, so may slow down the whole instance.

    You can use Publish Queue Viewer to know how many jobs are running on your instance on:
    - Sitecore Publish Queue Viewer - 1
    - Sitecore Publish Queue Viewer - 2

What can be the optimized publishing approach?

To get best performance with publishing, you might need to take care below things:
  • Proper Cache Tuning on PI as per need
  • Prevent frequent and long publishes
  • Allow Publish Basket facility, means adding media and other items' references
  • Allow scheduling publishing
I'll be posting regarding this very soon!!

How can I setup and use Sitecore Publish Instance?

Refer my earlier post regarding Publishing Scalability or Setting Publish Instance. This post describes how we can set separate Publish Instance and how it works.

Can I use multiple publish instance to support parallel publish?

Many have asked me the question, is it really possible to create Multiple Instances which can do publish parallel? The answer is YES. Although, Sitecore does not recommended this approach as per its architecture. But, Sitecore architecture is so scalable, we can still achieve it.

Refer my earlier post regarding Multiple Publish Instance or Parallel Publishing

Must read posts for Sitecore Publish

- Intelligent Publish in Sitecore - The most optimized approach
- Setup Publish Instance
- Sitecore Parallel Publishing using Multiple Publish Instances

Sitecore Multiple Publish Queue (Parallel Publishing)


Are you facing a long long queue stuck up with Sitecore publishing and clients are complaining a lot? Then surely you might have think about having multiple publish queue.

See my other post regarding Practical Implementation of Sitecore Parallel or simultaneous Publishing using multiple Publish Queue.

Benefits of Parallel Publishing:

  1. More than one user can do publishing simultaneously, so no more "Publishing Queued".
  2. Less load on CM environment, where actually users are editing or previewing pages as publishing load is now shared with Publish Instances.
  3. Less chances of Publish Queue stuck-up as Publish Jobs threads are now divided between multiple instances.
  4. If one publish instance is stuck-up, then we can move publishing traffic to another instance.

What is expected?

The expectation is to do parallel publishing on two or more Sitecore Instances. Say, our Content Authors' publish should go to PI-1 and clients' publish should go to PI-2. Or, Content Editor publish should go to PI-1 and Page Editor publish should go to PI-2.


This idea is quite possible and easier too. Let's see how can we use multiple publish queue. For that, you might need to understand How Sitecore Publish Instance works.

What is the Challenge?

As we see from the above link, Sitecore allows to add only one PublishInstance name, as per below setting so publishing will be done from that server itself.
        <setting name="Publishing.PublishingInstance">
           <patch:attribute name="value">CM-PI-1</patch:attribute>
        </setting>
So, the problem is well described in below image. See the red balloon points.
Ohhhh.... how to come out from this challenges, as Sitecore does not support this? Well, we have an alternate to overcome this issue.

Solution to Setup Multiple Publish Instances

As we seen, when Sitecore CM sets publish, it is recorded in EventQueue and then the related PI will pickup that publish and start publishing. Can't we do the same process by bypassing EventQueue? I mean we can prepare our own Event Queue.

So, that's really possible now. Also, don't worry about caching updates, means items updated/published on CM or PI-1 or PI-2 will get reflected on other servers immediately using Event Queue. So, our main concern should be publishing only.

There can be two different approaches to achieve this:
  1. Creating own table same as EventQueue
  2. By Invoking Web Service to start Publish

1. Creating own table same as EventQueue

  • We can create own table, which can have fields like below:

    Fields in MyPublishQueue
    ID
    ItemId
    SubItems
    Languages
    PublishType
    PublishInstance

    So, when user sets publish from CM, we will not start publish. We will just make entries in above table, with appropriate Publish Instance Name.
  • Now, both PI will have a our new Sitecore scheduler running. This scheduler should be triggered every few time interval as per our need, same as EventQueue checks. Write down some code to find any publishes for their own instance, and starts publish there itself. Refer Alex Shyba's blog to Create Sitecore Scheduler.

Below image shows how to achieve this approach. Here, as what we expect, Content Editor publish should go to PI-1 and Page Editor publish should go to PI-2, which is maintained by our Custom EventQueue table.

Parallel Sitecore Publish using custom EventQueue

This approach is very useful when we use for Scheduled Publish.

2. By Invoking Web Service to Start Publish

We can create a web service on both PIs, with input parameters as below:
  • ItemId
  • SubItems
  • Languages
  • PublishType (Smart/Republish)
This web service will do publish according to the passed items. So, when user sets publish from CM for PI-1 or PI-2, web service of respective PI should be invoked. So, publishing will be started by the webservice itself.
Below image shows how to achieve this approach.

Parallel Publish using WebService


This approach is very useful when we are not using Scheduled Publish.

Finally, you might be knowing how to start publishing using Sitecore. If No? See the code below:
public void PublishItem(Sitecore.Data.Items.Item item, User user)
{
 using(UserSwitcher(user))
 {
  // The publishOptions determine the source and target database,
  // the publish mode and language, and the publish date
  Sitecore.Publishing.PublishOptions publishOptions =
  new Sitecore.Publishing.PublishOptions(item.Database,
              Database.GetDatabase("web"),
              Sitecore.Publishing.PublishMode.SingleItem,
              item.Language,
              System.DateTime.Now);  // Create a publisher with the publishoptions
  Sitecore.Publishing.Publisher publisher = new Sitecore.Publishing.Publisher(publishOptions);

  // Choose where to publish from
  publisher.Options.RootItem = item;

  // Publish children as well?
  publisher.Options.Deep = true;

  // Do the publish!
  publisher.Publish();
 }
}

Note: Using multiple Publish Instance can be done with 3 Sitecore instances CM, PI-1 & PI-2. We can also do parallel publish with total two instances too CM & PI-1.

Sitecore does not recommend to have Multiple Publishing Instances. But, using above approaches, we implemented Parallel Publishing in 2012 with Sitecore 6.4.1, published millions of items with parallel publish, and still counting.

No need to say but having multiple Sitecore instances requires license accordingly.


No words to say about great Sitecore Architecture!!

Must read posts for Sitecore Publish

- Sitecore Publishing Facts
- Intelligent Publish in Sitecore - The most optimized approach
- Sitecore Setup Separate Publish Instance

Site-wise languages in Sitecore Ribbon for multisite environment

Are you working in Sitecore multisite environment and different sites are built in different languages? Then one idea should come in your mind that can't we set site-wise languages to the Page Editor's Webedit Ribbon and Content Editor's Language Gallery Form.

By default, the ribbon shows all languages defined in /sitecore/system/Languages. In our Sitecore instance, there are 40+ languages and many different culture sites. So, this idea came in our mind and implemented.

See below snap, there are total 5 languages in System.

Default Languages in Content Editor


Default Languages in Page Editor


Expected Behavior

Now, suppose, your site A uses 2 languages and site B uses other 3 languages. Then selecting item of site A, it should show 2 languages and same for site B, it should show 3 languages.

In this example, the site is built in 3 languages: En, hi-IN, de-DE. So, the ribbon should not show other languages en-GB and fr-FR. See below snap what is expected.

Solution

Prepare template to choose site-wise languages

We can have a multilist field to the Home Item of each site, where we can choose site's languages from the whole list from /sitecore/system/languages. See below screen.


Change Languages in Content Editor Gallery

Open file: \Website\sitecore\shell\Applications\Content Manager\Galleries\Languages\Gallery Languages.xml Change the code beside to your custom code. SO, update the file as below:
     <!-- comment below line -->
     <!--<CodeBeside Type="Sitecore.Shell.Applications.ContentManager.Galleries.Languages.GalleryLanguagesForm,Sitecore.Client"/>-->

     <!-- add below line -->
     <CodeBeside Type="SitecoreTactics.GalleryLanguagesForm, SitecoreTactics"/>
Code in the CodeBeside file: Create a custom class, which will be a repilca of the Sitecore.Shell.Applications.ContentManager.Galleries.Languages.GalleryLanguagesForm class. We just need to override OnLoad event in this class. So, this will be look like..
namespace SitecoreTactics
{
 public class GalleryLanguagesForm : Sitecore.Shell.Applications.ContentManager.Galleries.GalleryForm
 {
  // Other methods

   protected override void OnLoad(EventArgs e)
  {
   Assert.ArgumentNotNull(e, "e");
   base.OnLoad(e);
   if (!Context.ClientPage.IsEvent)
   {
    Item currentItem = GetCurrentItem();
    if (currentItem != null)
    {
     // Comment below line from the code
     //foreach (Language language in currentItem.Languages)

     // Instead of all languages, we will pass only selected languages
     LanguageCollection languages  = GetMySelectedLanguages();
     foreach (Language language in languages)
     {
      // Same code which is in foreach block
     }
    }
   }
  }
  
  // Other methods

 }
}

Download above sourcecode

Here is the expected output:

Change languages in Page Editor

For this, we need to update the command from Commands.config file as below:
     <!-- comment below line -->
     <!--<command name="webedit:changelanguage" type="Sitecore.Shell.Applications.WebEdit.Commands.ChangeLanguage,Sitecore.Client"/>-->


     <!-- add below line -->


Code in the class file: Create a custom class, which will be a repilca of the Sitecore.Shell.Applications.WebEdit.Commands.ChangeLanguage class. We just need to overrideExecute event in this class. So, this will be look like..
namespace SitecoreTactics
{
 public class ChangeLanguage : WebEditCommand
 {
  // Other methods
 
  public override void Execute(CommandContext context)
  {
   Assert.ArgumentNotNull(context, "context");
   if (context.Items.Length == 1)
   {
    Item item = context.Items[0];
    
    // Comment below line
    //LanguageCollection languages = LanguageManager.GetLanguages(item.Database);
    
    // Instead of all languages, we will pass only selected languages
    LanguageCollection languages  = GetMySelectedLanguages();
    
    SheerResponse.DisableOutput();
    Menu control = new Menu();
    foreach (Language language in languages)
    {
     string id = "L" + ShortID.NewId();
     string languageName = GetLanguageName(language.CultureInfo);
     string icon = LanguageService.GetIcon(language, item.Database);
     string click = "webedit:setlanguage(language=" + language.Name + ")";
     control.Add(id, languageName, icon, string.Empty, click, false, string.Empty, MenuItemType.Normal);
    }
    SheerResponse.EnableOutput();
    SheerResponse.ShowPopup("ChangeLanguageButton", "below", control);
   }
  }
  
  // Other methods
 }
}
Here is the expected output:


Cheers, finally we achieved site-wise selected languages for each site for our multisite Sitecore environment.

Other Language specific customizations - used for multisite environment:
Why my Sitecore Media Item created in multiple languages?
Upload Sitecore media items in selected languages

Hostname Resolution without editing Host File

Have you ever thought to map hostname without changing host file? If your Sitecore or any other website is working with Load Balanced environment with multiple servers, you surely have thought to point your request to a particular server (IP Address). When you need to check your functionality working/not working on any of these servers, you are surely going to make host entry for individual servers one by one and test the site.

Uffff... it's so boring and lengthy task and chances of human mistakes. Let's see how we can automate this.

Traditional way for Host Name Resolution Using a Hosts File

Find Hosts file in the %SystemRoot%\system32\drivers\etc directory. Read more about Host Name Resolution. Following is an example of the contents of the Hosts file:
#
# Table of IP addresses and host names
#

127.0.0.1 localhost
192.168.220.111 www.patelyogesh.in # Server-1
#192.168.220.112 www.patelyogesh.in # Server-2

How we can bypass hosts file for host name resolution

Traditional way to get response using WebRequest is requesting to http://www.patelyogesh.in but this will get content from any of the servers which Load Balancer choose for our request.

We can get content from particular server by requesting to: http://<IP Address>/<Page> and passing host/domain name as request.Host as below:
      
var request = (HttpWebRequest)WebRequest.Create("http://<IP Address>/<Page>");
request.Host = HostName;
Let us see how whole source code / GetResult function will be to achieve this:
      string strIPAddress = "192.168.220.111";
      string strHostName = "www.patelyogesh.in";

      string result = GetResult(strIPAddress, strHostName);

      public string GetResult(string strIPAddress, string strHostName)
      {
            var request = (HttpWebRequest)WebRequest.Create("http://" + strIPAddress);
            request.Host = strHostName;

            request.Credentials = CredentialCache.DefaultCredentials;
            HttpWebResponse response = (HttpWebResponse)request.GetResponse();

            // Get the stream containing content returned by the server.
            Stream dataStream = response.GetResponseStream();

            // Open the stream using a StreamReader for easy access.
            StreamReader reader = new StreamReader(dataStream);

            // Read the content. 
            string responseFromServer = reader.ReadToEnd();

            // Cleanup the streams and the response.
            reader.Close();
            dataStream.Close();
            response.Close();
            return responseFromServer;
      }
Again, www.patelyogesh.in is mapping to 192.168.220.111. Now suppose we want to request to http://www.patelyogesh.in/AboutUs.html page, we can pass parameters as:

var request = (HttpWebRequest)WebRequest.Create("http://192.168.220.111/AboutUs.html");
request.Host = "www.patelyogesh.in";
Thus we can access all the pages using C# .NET 4.5 bypassing host file using above source code.

Hope you like this idea! Cheers!!

Sitecore bypass login without password

This blog explains how to bypass login for any Sitecore user or how to implement Single Sign-On on Sitecore to automate user login without knowing password.

Practical Use

Suppose, you have a non-Sitecore application, which has different users and all its users also access Sitecore by login into it. Now, switching between these two sites is really repetitive and time-consuming task, need to remember passwords for two websites, etc. If we provide SSO (Single Sign-On) here so that the user logs in only once and access both Sitecore and non-Sitecore websites with single login.

How to achieve

Create a web page in Sitecore website suppose sso.aspx, that will do login in Sitecore with passed userame via querystring. After login, we have to redirect user to welcome.aspx.

So, from the non-sitecore application, we will call url: http://mysitecore.com/sso.aspx?username=user_sitecore. On load of the page, we will login using user_sitecore and redirect user to welcome.aspx.

But make sure you encrypt username before passing in querystring. You can also pass a unique token number (A random generated number/string) along with username and encrypt it to make it more secured.

Login without password is possible using Sitecore.Security.Authentication.AuthenticationManager.Login(username) function. See below source code:

public partial class SSO : System.Web.UI.Page
{
    protected void Page_Load(object sender, EventArgs e)
    {
         string strUserName = Request.QueryString["username"];
         if (Sitecore.Security.Authentication.AuthenticationManager.Login(strUserName))
         {
               Response.Redirect("welcome.aspx", true);
         }
    }
}

Hurrey.... we did login without giving user password.

Sitecore Publish Instance

Are you not getting any direction to improve your Content Management server performance due to publishing? Are you facing slowness while doing publishing or having publishing queue stuck-up issues? Separate Publish Instance is one of the solution.

How to setup Sitecore Publish Instance?

  1. Sitecore PI is nothing but a clone instance of Sitecore CM environment.
  2. On CM server, open \Website\App_Config\Include\Scalability.config file. Update Publish Instance Name as below.
            <setting name="Publishing.PublishingInstance">
               <patch:attribute name="value">PI-Sitecore</patch:attribute>
            </setting>
    
    If the value is empty Sitecore will use the instance name by combining the machine name and the IIS Site name. So for the IIS Site Sitecore on the server PI the instance name would become PI-Sitecore.
    Just to remember, do not configure above setting on Publish Instance.
    Note: Sitecore allows to add only one publish instance name in this setting.
  3. Enable EventQueue on both CM and PublishInstance servers. To enable EventQueues, from web.config, find EnableEventQueues setting. Set its value to true. This setting can also be set from \App_Config\Include\ScalabilitySettings.config, which will be given more precedence over web.config settings.
          <setting name="EnableEventQueues">
            <patch:attribute name="value">true</patch:attribute>
          </setting>
    
  4. Disable any scheduled tasks or agents running if not required.

How Publishing works on Publish Instance?

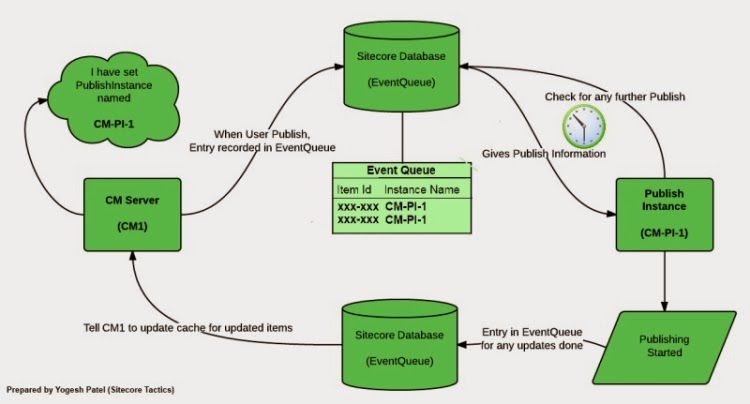
Below image shows the flow of publishing from CM to PI server.
Sitecore Publish Instance Architecture


Suppose, Sitecore CM Application has Instance named Staging-Sitecore (In image: CM1), and Publish Instance is named PI-Sitecore (In image: CM-PI-1). Now, as per above settings, Sitecore CM1 knows that it's publishing should be done by Publish Instance: PI-Sitecore.

Now, when a user sets a publish job, Sitecore adds its entry in EventQueue table with a flag/column of PublishInstance. It simply adds PI-Name in that column's value. So, every publish job is assigned its Publish Instance Name. Now, as per EventQueue architecture every Sitecore Instance checks for EventQueue every few seconds to fetch which events/jobs it has to perform. Here, when CM1 server checks EventQueue, it will not find any publish job, where PI will find records with its name. So, it will fetch those publish details and start publishing those publish jobs.

Now, as per architecture, all other instances will start updating cache of those published and related items, to get updated.

Can we utilize Publish Instance for other tasks?

- PI is not only PI, which can still be used as CM. So, we can have two Content Management servers. So, we can make less used CM as PI.

- If we are using it only for Publishing, then we can reduce load of CM server by moving all backend tasks or jobs(except Sitecore default) to PI.

How many instances Sitecore supports?

Logically, unlimited. We can have multiple Sitecore Instances working as CM with/without load-balanced environment with one PI.

As per Sitecore architecture, only one PI is recommended. But after reviewing publishing code and my experiements done locally, I concluded that we can have two PIs too. But, that will work with minor architecture change and only one limitation that an item can not be published on both PIs simultaneously.

Must read posts for Sitecore Publish

- Sitecore Publishing Facts
- Intelligent Publish in Sitecore - The most optimized approach
- Sitecore Parallel Publishing using Multiple Publish Instances

Sitecore on Cloud - Windows Azure and Amazon EC2

We investigated a lot of time which cloud service is better for our Sitecore architecture. It is always good to know about reliability, efficiency, scalability and agility for the cloud service we are going to use.

Here are some points I concluded while working on both of Microsoft Azure and Amazon EC2. Azure is a IaaS, while EC2 is PaaS, so surely both are having some pros and cons. Below are few points I collected while working on it.


Points Windows Azure Amazon EC2
Computing Category Infrastructure as Service Platform as Service
Guaranteed Network Availability

99.999%

99.9%
SQL Database
Database Capacity

Allows maximum 150GB size of SQL Azure database. We can then use a cloud VM for using SQL.

No limitation on size of database, as need a separate VM.

Database Backup/Restore

Many limitations in backup/restore on SQL Azure a more mature environment for backup/restore than Azure
Load Balancers
Sticky Session Configuration Does not support Sticky sessions, so session based functionalities will not work Still, they are paid. - Free and allows sticky session configurations.
Multi-region load-balancing Can not support multi-region servers. Can not support multi-region servers, but we can use 3rd party services to handle multi-region servers
Deployment
Quick deployment Sitecore Azure works superbly if you have valid Sitecore and Sitecore Azure versions, which makes automated deployment so easy and quick. Very easy to create multiple sitecore instances using it. Deployment is not automated as they provides a remote console, still automated deployment is possible using WebDeploy.
Troubleshooting It is very difficult to troubleshoot deployment problems faced using Sitecore Azure. Manual deployment does not create any issues
Backup and Monitoring Has some basic monitoring system AWS
Support Paid Support Free Support

If you want to try and experiment cloud services, go to Windows Azure or Amazon EC2. Both of them provides free cloud services for limited time period.

Upload Sitecore media items in selected languages

One day, one idea came in my mind to create media items in specific languages only, which is very useful thought. By default, Sitecore media item gets created in many languages, where we need actually one or two out of them. Want to know why? Then read why sitecore media item gets created in multiple languages.

NOTE: This issues was recreated in Sitecore 7.2 and older versions. Sitecore 8 and later creates media items only in context language.

Specific languages for Unversioned Media Item

How it's benefitial?
In Unversioned media item, item gets created in all languages exist under /sitecore/system/languages/. Creating its version in selected languages is benefitial:
  1. Less insert queries to DB tables, less records fetched while fetching media item details.
  2. DataCache and ItemCache will be created in selected languages only instead of all languages.
  3. Reduced Database size, where millions of media are stored.
  4. So, overall performance improvement while uploading media item and while using/fetching media item.
How to achieve it?
  1. Create your custom class inherited from the Sitecore.Resources.Media.MediaCreator one, say SitecoreTactics.Resources.Media.MediaCreator. In this class you should override CreateItem method to retrieve there the set of the languages from the web.config setting. This set should be used as the languageArray in the foreach cycle. Thus the unversioned mediaitem with certain language versions will be created.

    See how it looks:
    namespace SitecoreTactics.Resources.Media
    {
     using System.Reflection;
     public class MediaCreator : Sitecore.Resources.Media.MediaCreator
     {
      protected override Item CreateItem(string itemPath, string filePath, MediaCreatorOptions options)
      {
       // Override the CreateItem function method and write custom code to create selected language versions
      }
      }
    }
    
    
  2. Create your custom class inherited from Sitecore.Resources.Media.MediaProvider one. In the constructor of this class you should assign an instance of our custom MediaCreator class (from Step#1) to the MediaProvider "creator" private field using the Reflection. So, the MediaProvider will use our own code of MediaCreator.

    How the code looks:
     namespace SitecoreTactics.Resources.Media
     {
      using System.Reflection;
      public class MediaProvider : Sitecore.Resources.Media.MediaProvider
      {
       public MediaProvider() : base()
       {
        typeof(Sitecore.Resources.Media.MediaProvider).GetField("creator", BindingFlags.NonPublic | BindingFlags.Instance).SetValue(this, new SitecoreTactics.Resources.Media.MediaCreator());
       }
      }
     }
    
    
  3. Change in config, register our custom mediaprovider class as below:
    <mediaLibrary>
        ...
        <mediaProvider type="SitecoreTactics.Resources.Media.CustomMediaProvider,SitecoreTactics.Resources" />
        ...
    </mediaLibrary>


Wow, it worked well!

Specific languages for Versioned Media Item

Versioned Media Item does not need an automated way to upload media in selected languages. The reason is, this kind of media does not share Media File. So, it is used only when we need to upload different files for different languages of same media item. If still someone need to achieve it, here is the way:
  1. Add a settings in the web.config file containing set of the pipe separated needed languages. For example:
    <setting name="SetOfLanguages" value="en|ru-RU|en-GB" />
    
  2. Add an extra checkbox "Versionable For Certain Languages" on the Media Folder Upload Form using this file: \Website\sitecore\shell\Applications\Media\MediaFolder\MediaFolder.xml
  3. Create a custom class inherited from Sitecore.Pipelines.Upload.UploadArgs and add here an extra "SpecialVersioned" property. This property will indicate to Sitecore.Pipelines.Upload.Save processor to execute the custom actions.
  4. Create a custom class based on Sitecore.Shell.Applications.FlashUpload.Advanced.UploadTarget one and define it in \Website\sitecore\shell\Applications\FlashUpload\Advanced\UploadTarget.aspx file instead of the default one.
  5. In this class you should assign a value to your custom UploadArgs.SpecialVersioned property similar to the UploadArgs.Versioned one.
  6. Create your custom class based on the Sitecore.Pipelines.Upload.Save one and register it in the web.config <uiUpload> pipeline instead of the default one.
  7. An example of its rewritten Process method is here: Expand Code
It's working great, isn't it?
And yes, many thanks to Yuriy Zakharov from Sitecore Support to provide such a nice solution!!

Sitecore Custom HTTP Handlers

We recently had a requirement that we need thumbnail for PDFs stored in Sitecore, so whenever we need to find PDFs or other media files, we can find out them by its thumbnail. In starting we thought to create a thumbnail for each media file and then store it to another location in Sitecore tree itself while uploading media. It was a good idea, but the problem in this approach would come when a user updates the media? We need to create thumbnail again... Same thing when user deletes/moves/publishes, etc. it needed to generate thumbnail all the time.

Finally we came to a perfect solution of using Custom HTTP Handler, using which we can fulfill this requirement easily.

Overview of Sitecore Custom Handlers?

Search for in your web.config. These are the custom handlers called by Sitecore to serve requests of media, xaml, icon, feed, etc. See below block in web.config:
    
      <handler handler="sitecore_media.ashx" trigger="~/media/" />
      <handler handler="sitecore_api.ashx" trigger="~/api/" />
      <handler handler="sitecore_xaml.ashx" trigger="~/xaml/" />
      <handler handler="sitecore_icon.ashx" trigger="~/icon/" />
      <handler handler="sitecore_feed.ashx" trigger="~/feed/" />
    
Sitecore.Pipelines.HttpRequest.CustomHandlers processor from httpBeginRequest dispatches requests to specialized handlers that are required. These handlers are defined in web.config under configuration/sitecore/customHandlers.

If the current request ends with the a handler’s file (e.g., sitecore_media.ashx), then Sitecore aborts the current pipeline, since this request is specifically targeting a handler directly, which are defined in system.webServer/handlers section as below, which shows that the media request will be served through Sitecore.Resources.Media.MediaRequestHandler. See below block of web.config:
   <handlers>
      <add name="Sitecore.MediaRequestHandler" path="sitecore_media.ashx"  type="Sitecore.Resources.Media.MediaRequestHandler, Sitecore.Kernel" verb="*" />
   </handlers>

Create own Sitecore Custom Handlers to generate thumbnails of media items

Now, we created a new custom handler for creating thumbnail and registered in handlers as below:
    
<configuration xmlns:patch="http://www.sitecore.net/xmlconfig/">
  <sitecore>

    <!-- Define Custom Handler -->
    <customHandlers>
      <handler trigger="~/mediathumb/" handler="sitecore_media_thumb.ashx"  />
    </customHandlers>

    <!-- Define Media Prefix -->
    <mediaLibrary>
      <mediaPrefixes>
        <prefix value="~/mediathumb" />
      </mediaPrefixes>
    </mediaLibrary>
  </sitecore>


  <!-- Define Web Handler -->
  <system.webServer>
 <handlers>
     <add verb="*" path="sitecore_media_thumb.ashx" type="SitecoreTactics.ThumbnailManager.PDFThumbnailRequestHandler, SitecoreTactics.ThumbnailManager" name="SitecoreTactics.PDFThumbnailRequestHandler"/>
 </handlers>
  </system.webServer>
</configuration>    
This class will create a thumbnail of the request PDF on-the-fly using GhostScript. We will save this thumbnail as Media Cache, so on the next request, the thumbnail will not be created, but will be served from Media Cache itself, same as Sitecore serves media items.

In this case suppose, the PDF we uploaded has URL:
http://mydomain.com/~/media/files/Docs/mypdf.pdf.
Now, we can get its thumbnail as JPG file using URL, which will be served by our new handler because it contains /~/mediathumb trigger.
http://mydomain.com/~/mediathumb/files/Docs/mypdf.jpg.

Finally, we do not need to take care if media item is moved, deleted, published or updated. I will attach its source code very soon.... :)

What else we can do using Custom Handlers?

- In above approach, we can also generate thumbnail of different size, dimensions passed through querystring, same way Sitecore provides it for images. Read how we can Resize Sitecore Media Images on the fly.
- Even Custom Handlers can be useful to serve different kind of resources like creating sitemap (/~/sitemap/), RSS for page or its children (/~/rss/), stylesheets (/~/css/), javascripts (/~/js/), etc.

Related Posts:
- PDF Thumbnail Handler
- Show PDF Thumbnail Icons in Content Editor

Sitecore media url - remove ashx extension

Have you ever marked all your media items are rendered in our page output as .ashx extension? By default, Sitecore renders all media files or images (.jpg, .gif, .pdf, .xls, etc.) as .ashx extension.

The same thing you will find while getting mediaurl for your media items.

You can render media with its own extension using Media.RequestExtension setting in web.config.
It defines the extension to use in media request URLs. It's default its value is ashx, so all media url are .ashx.
So, media's URL will be: http://mydomain.com/~/media/Images/Banner/image.ashx
<setting name="Media.RequestExtension" value="" />

Setting its value to blank will render media url with relevant extension. Now, all your media items will be rendered in page output with its valid extension like, http://mydomain.com/~/media/Images/Banner/image.jpg
Still, your existing URL http://mydomain.com/~/media/Images/Banner/image.ashx will also work.

Image url can have different querystring parameters. Read more for Image Control and QueryString parameters.