Sitecore Tactics Blog Completed One Year!


Today is a special day for the Sitecore Tactics, which completed 1 year today. I started blogging on Sitecore exact one year back on the same date with lot of excitement, passion and dream. I continued putting my efforts and serving best knowledge and tactics to my readers so that I can contribute in this blogging community.

Today, it is great co-incidence, I wrote my first Sitecore Blog on 27th June, 2013, today is 27th June, 2014, and today my Sitecore blog visits crossed figure of 27,000 and my birthday comes on date 27th (What a coincidence). For total 40 posts, average 74 pageviews came to this blog per day in last one year and 4,000+ requests per month from last 3 months.

Thank you all my blog readers all around the world for reading my blogs. Increasing blog visits really encouraged me to write more and more blogs.

IRequiresSessionState slowing down Sitecore Media Requests


For last few weeks we faced a performance issue on our Sitecore production servers. Page response time was substantially increased by 50% and getting slowness in full page loading. While investigation we found that this was just because of our customized MediaRequestHandler.

Our requirement was to display some Disclaimer Page when a user request for some Sitecore media files (not for any image), after accepting disclaimer we can continue to download requested media. All other media items should be served directly.

We used session for managing this disclaimer. For using session in the MediaRequestHandler, we implemented iRequiresSessionState interface in it. See below code snippet
    class CustomRequestHandler : Sitecore.Resources.Media.MediaRequestHandler, IRequiresSessionState
    {
        protected override bool DoProcessRequest(HttpContext context)
        {
            if (context.Request.Url.ToString().ToLower().Contains("/~/media/files/"))
            {
                // Check session, if session does not available, then send it to disclaimer
                // Once user accepts Disclaimer, generate a session with user details.
            }
            else
            {
                // Proceed all image requests
                base.DoProcessRequest(...);
            }
        }
    }

So, what the reason for the slower page rendering? Yes, that's IRequiresSessionState which was a halts in performance.

Can IRequiresSessionState really make my page slower?

Below image shows how ASP.NET Session state works:


Now we can definitely say YES, it can slow down. State access requires that the aspx pages or handler, run sequentially. Each page/handler may read from and write to the session state. To handle this without creating any errors in the session state, .NET will only run one at a time using locking mechanism, so no handlers will run when the aspx page itself is running.

Tactics:
  • Can we customize handler not to use session state?
    - No, this will disable session so we cannot achieve disclaimer functionality
  • We can decide the request needs session or not and use session dynamically.
    - Is it possible? Yes, it is, using HttpModules

Solved by Dynamically deciding Session State Behavior programmatically

Changing ASP.NET session state behavior dynamically is possible only using HttpModules or Global.asax. It is not possible in HttpHandlers or other code behind. This solution is possible only in .NET 4.0 and later. Yes, we can define it at Page Directives but that's static.

As per our requirement, we have to show Dislaimer for selected Sitecore Media Files only (Not for any Media Images), we thought to create a HttpModule, which will check whether the request is for media files or images. If it is a file, then enable session state and if it is an image, disable session state.

Step-1:

We removed IRequiresSessionState from our CustomMediaRequestHandler, so it will not use Session State directly.

Step-2:

Created HttpModule, which will decide whether to use Session State or not.
    public class CustomMediaRequestSessionModule : IHttpModule
    {
        public void Init(HttpApplication application)
        {
            application.BeginRequest += (new EventHandler(this.Application_BeginRequest));
        }

        private void Application_BeginRequest(Object source, EventArgs e)
        {
            HttpApplication application = (HttpApplication)source;
            var CurrentContext = HttpContext.Current;

            if (CurrentContext.Request.Url.ToString().ToLower().Contains("/~/media/files/"))
            {
                // Files need Disclaimer functionality, so session needed
                CurrentContext.SetSessionStateBehavior(System.Web.SessionState.SessionStateBehavior.Required);
            }
            else if (CurrentContext.Request.Url.ToString().ToLower().Contains("/~/media/images/"))
            {
                // Images do not need Disclaimer, so no session needed
                CurrentContext.SetSessionStateBehavior(System.Web.SessionState.SessionStateBehavior.Disabled);
            }
        }
        
        public void Dispose()
        {
        }
    }

Step-3:

Now, in web.config, register this module under system.webServer/modules section:
 <add type="SitecoreTactics.Resources.Media.CustomMediaRequestSessionModule, SitecoreTactics" name="CustomMediaRequestSessionModule" /> 

And now we checked Page Response time, now feeling heavenly. All problem gone, Page Response Time now dropped down to earlier stage.

Good reads for improving Sitecore Media Item Performance

Improve Sitecore Media Performance using Reverse Proxy

- Are you facing slowness in serving media library items?
- Are you getting increased response time due to media requests?
- Is your Sitecore instance serves media slower even if you have applied output (response) cache?

Then this post will surely help you, which describe how we can improve Sitecore Media Library performance by implementing Reverse Proxy Server.

How Reverse Proxy will help to improve media performance?

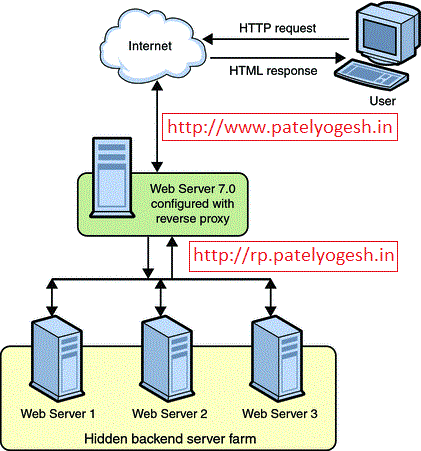
The Reverse Proxy will play a role being a proxy between the client and Sitecore web server. Reverse Proxy provides caching mechanism, which caches all media items. So, once any user has requested any media file from server, will be get cached on Reverse Proxy itself. So, from second time onwards, Reverse Proxy will not get media from Sitecore Web Server but will serve it from its own cache.

We can use URL Rewrite Module and Application Request Routing (ARR) to implement a Reverse Proxy Server.


Step - 1 : Install ARR and Url Rewrite on IIS?

  1. Setup IIS 7.0+ on your Server which will work as Proxy.
  2. Install URL Rewrite module. You can download it from here.
  3. Install ARR module. You can download it from here.

Step - 2 : Configure URL Rewrite module:

  1. Create a new Website in IIS or use Default website, and click on Website, then click on URL Rewrite option under IIS section
  2. Edit inbound rules as below:


    Above configuration shows that if requested host is www.patelyogesh.in, then this rule will be applied for its all requests (*).
  3. Configure Rewrite URL for above configurations as below. This will make sure that all requests coming from http://www.patelyogesh.in/ will be rewrited to http://rp.patelyogesh.in/*.


    When we apply above configurations, it will generate a web.config file under the website directory, which will look like below:

    <system.webServer>
        <rewrite>
          <rules>
             <rule name="Sitecore-Production" stopProcessing="true">
                 <match url="(.*)" />
                 <action type="Rewrite" url="http://rp.patelyogesh.in/{R:1}" />
                 <conditions>
                     <add input="{HTTP_HOST}" pattern="www.patelyogesh.in" />
                 </conditions>
             </rule>
          </rules>
        </rewrite>
      </system.webServer>
    

    We can also configure multiple domain's URL rewrites in the same way.

Step - 3 : Configure ARR (Application Request Routing) Cache

  1. Select the Server Node, now select Application Request Routing Cache option.

  2. Add Drive where the caching will be stored by ARR Module. The below image shows how we can configure ARR module and how it will look.
  3. Make sure the Identity user of the Application Pool should have read/write access of the drives configured here. So, ARR will store all cache files here only.

  4. Enable Proxy As per below image, click on Proxy Settings on the right side bar and enable Proxy.


Finally, Reverse Proxy setup finished, took just 15 minutes only!!

Now, Request to http://www.patelyogesh.in/. This will serve you content from http://rp.patelyogesh.in itself by traversing through Reverse Proxy. It's really easy and simple, isn't it?

How to confirm Reverse Proxy working fine?

We can provide our Custom Response Headers using Proxy Settings from ARR Cache option as shown in above image. So, if Reverse Proxy is working well, we will get those headers in response.

How to confirm ARR Caching working fine?

In File Explorer, open the Drive folder we configured in ARR Cache settings. We will get all files cached by ARR.

Cache for the URL: http://www.patelyogesh.in/~/media/Images/yogi.png (Rewrited URL: http://rp.patelyogesh.in/~/media/Images/yogi.png) will be stored at : <website root>\rp.patelyogesh.in\~\media\Images\yogi.png.full.

How to delete ARR cache programmatically?

In ARR Cache settings, you will find a button Delete Specific Cached Objects which can clear specific URL cache. It also supports wild cards for clearing cache.

We can create a web service on the ARR website, which will get a URL as input and will clear cache accordingly using below code. Now, on each media item publish from Sitecore, we will clear the ARR cache. We can decice How and when to make a call to the ARR web service to cache clear according to our architecture.

Source code to clear ARR cache programmatically:
[WebMethod]
public static ClearCache(string urlToCacheClear)
{
      var url = urlToCacheClear == "ALL" ? string.Empty : urlToCacheClear;

      var m = new ServerManager();
      var x = m.GetApplicationHostConfiguration().GetSection("system.webServer/diskCache");
      var method = x.Methods["FlushUrl"].CreateInstance();
      method.Input.SetAttributeValue("url", url);
      method.Execute();
}

Enjoy Reverse Proxy! Enjoy improved Sitecore Media Library performance!!

Good reads on Reverse Proxy:
- http://www.agarwalnishant.com/2013/04/improve-sitecore-media-library.html

- http://www.iis.net/learn/extensions/url-rewrite-module/reverse-proxy-with-url-rewrite-v2-and-application-request-routing

How Sitecore media cache Works?

Sitecore stores all media cache to file system, unlike all other caches, stored in RAM. Media items are stored in database, so media cache is required to reduce database calls and serve media files faster to end-user. Let's understand Sitecore media cache mechanism.

How Media Cache Created?

- When we upload a new media file to Sitecore, its media cache is created in Website\App_Data\MediaCache\<sitename>\<Hashcode of MediaId> folder. Sitecore assigns unique MediaId to each media item, which gets changed on each modification of media item.

- For each media item, Sitecore creates an INI file with name of MediaId in the respective folder, which stores different attributes of the media file inside it.

See below image as a reference:


In above case, this media's MediaId is "8c683332453741038b8876bf5915d188", so the ini file (8c683332453741038b8876bf5915d188.ini) is generated with name of MediaId. On right side, all information is stored in same file. dataFile shows physical media file name 7b4a5e3934914d57a390bedcab67380c.jpg.

Different attributes in INI file:
Attribute Description
Key height, width, thumbnail, background color, etc. image parameters passed by query string. You can get better idea by reading my earlier Blog Post on Sitecore Image Control Parameters
extension Extension of  media file.
headers Content Type, etc.
datafile Physical file name stored as media cache in same folder.

How Media Cache Deleted?

Sitecore provides a cleanup agent to clear older media files, which clears media files every specified interval of time. By default it clears all media cache files created 90 days ago. See below settings in web.config:
    
     <agent type="Sitecore.Tasks.CleanupAgent" method="Run" interval="06:00:00">
        <!-- Specifies files to be cleaned up.
             If rolling="true", [minCount] and [maxCount] will be ignored.
             [minAge] and [maxAge] must be specified as [days.]hh:mm:ss. The default value
             of [minAge] is 30 minutes.
             [strategy]: number of files within hour, day, week, month, year
             [recursive=true|false]: descend folders?
        -->
        <files hint="raw:AddCommand">
          <remove folder="/App_Data/MediaCache" pattern="*.*" maxAge="90.00:00:00" recursive="true" />
        </files>
      </agent> 

Media Cache Hidden Secrets

  • If a user has requested a media file with different querystring parameters, then Sitecore creates different media files runtime and stores all those files in same folder where original media file is stored. Also, all these combinations are stored in the same INI file itself.

    You can try accessing your media image with different parameters like below and check media cache:
    -http://sitecoreblog.patelyogesh.in/~/media/Images/myimage.jpg
    -http://sitecoreblog.patelyogesh.in/~/media/Images/myimage.jpg?h=100
    -http://sitecoreblog.patelyogesh.in/~/media/Images/myimage.jpg?w=200
  • When a media item is updated, Sitecore creates a new media cache with new INI file and a new media file even though the media file(blob) remains same or item already has same media cache. So, there will be duplicate media cache but Sitecore will refer to latest file only.
  • As we know Sitecore creates media cache in folder with name of Context Site. So, if one media file is accessed by two different Sites (SiteContext), then media cache will be generated for both sites, means in both sites' folders. For example, When media item is accessed by Content Editor, cache will be created for Shell site and when accessed by Website, then it will be created for Website.

How to read/create media cache programatically?

Yes, it's possible to create or read media cache by Sitecore API:
    
    ///////////////////////////////////
    // Read Media Cache
    ///////////////////////////////////

    MediaRequest request; // media parameters like height, width, etc.
    Sitecore.Resources.Media.Media media // item for which you want to read media cache.

    // set request.Options
    // set media

    // This is the media cache stored in MediaStream
    MediaStream mStream = MediaManager.Cache.GetStream(media, request.Options);


    ///////////////////////////////////
    // Write Media Stream to Media Cache
    ///////////////////////////////////

    // Manipulate your media file and set it into MediaStream

    // store the media stream to media cache.
    MediaManager.Cache.AddStream(media, request.Options, mStream, out outStream);

We can know more about Media Cache understanding below classes using Reflector:
- Sitecore.Resources.Media.MediaCache
- Sitecore.Resources.Media.MediaCacheRecord

Sitecore Parallel Publishing Implementation

Many readers of my blogs asked me the practical way to implementing parallel publishing using multiple publish queue on Sitecore. Earlier I have posted a blog on it explaining theoretical approach for Parallel Publishing in Sitecore using custom EventQueue. It is really difficult to explain that approach on a blog. So here, I am going to explain easiest and quickest implementation of multiple publish queue practically.

Why Parallel Publishing from different instances?

In our multisite environment, hundreds of users work at a time, add/update thousands of items and publish them frequently. Daily 15,000+ items get published. Sometimes this number crosses 50,000 per day. So, mostly we see long publishing queue and users have to wait for minutes to get their items published. To make publishing more scalable, we thought to have multiple publishing instances in our CM environment and we dedicated them for different types of users based on business need.

What we wanted to achieve:

We wanted to have three different Publishing Instances for our users.
Publish Instance - 1(PI-1) Dedicated to Client Content Authors.
Publish Instance - 2(PI-2) Dedicated to Internal Content Authors.
Publish Instance - 3(CM-1) Dedicated to all other users. This is the Content Management Server, where users use Page Editor or Content Editor.

For this, we created three different roles named Publish Instance One, Publish Instance Two and Content Management Instance. So, depending on role assigned, we will allocate Publishing Instance to the user.

How we hooked Publishing Process

Below image shows how we hooked and modified startPublishing event to choose Publish Instance depending on user publishes.

Parallel Publishing Architecture with Multiple Sitecore Instances

Let's see practical implementation of Parallel Publish in Sitecore?

You can see How Parallel Publishing works on Sitecore in below video.
In this video, below is the allocation done for users:

User Role Allocated Publishing Instance
sitecore\admin Publish Instance One Machine-PI-1
sitecore\yogesh Publish Instance Two Machine-PI-2
All other users Content Management Instance Machine-CM

So, we have three different Publishing Queues available.


Now see how we can achieve this in simple steps below:
  1. Setup three different CM instances (in a cluster) with same master, web and core databases.
  2. Parallel publishing requires 1+ Sitecore Instances So indirectly we can say parallel publishing is possible on n number of CM instances.

  3. Enable EventQueue on each instance
  4. On all the Sitecore Instances, it is must to enable EventQueue from web.config or App_config\Include\ScalabilitySettings.config file.
         <setting name="EnableEventQueues" value="true" />
       
  5. Configure allocation of Roles & Publishing Instances
  6. On all the Sitecore Instances, create a config file: App_config\Include\ParallelPublish.config file. This file should remain same on each instance.
    <configuration xmlns:patch="http://www.sitecore.net/xmlconfig/">
      <sitecore>
        <parallelpublishRoles>
          <!-- Roles needed for Parallel Publising -->
          <role name="sitecore\Publish Instance One" publishinstance="Machine-Sitecore-PI-1" />
          <role name="sitecore\Publish Instance Two" publishinstance="Machine-Sitecore-PI-2" />
          <role name="sitecore\Content Management Instance" publishinstance="Machine-Sitecore-CM" />
        </parallelpublishRoles>
      </sitecore>
    </configuration>
       
  7. Override publish:startPublishing Event with your custom code as below
  8. namespace SitecoreTactics.Publishing
    {
        public class RemotePublishingEventHandler : Sitecore.Publishing.RemotePublishingEventHandler
        {
            public override void OnStartPublishing(object sender, EventArgs args)
            {
                RemoteEventArgs<Sitecore.Publishing.StartPublishingRemoteEvent> args2 = args as RemoteEventArgs<Sitecore.Publishing.StartPublishingRemoteEvent>;
                if (args2 == null)
                {
                    throw new InvalidOperationException("Unexpected event args: " + args.GetType().FullName);
                }
    
                Sitecore.Globalization.Language lang = Sitecore.Globalization.Language.Parse(args2.Event.ClientLanguage);
                StartPublishingRemoteEvent myArgs = new StartPublishingRemoteEvent(args2.Event.Options, args2.Event.StatusHandle, args2.Event.UserName, lang);
    
                // Findout Dedicated Publishing Instance for current user
                string allocatedPublishInstance;
                using (new SecurityDisabler())
                {
                    User user = User.FromName(args2.Event.UserName, true);
    
                    allocatedPublishInstance = GetPublishInstanceForUser(user);
                }
    
                // Allocate Publishing Instance to current publishing
                myArgs.SetPublishInstance(allocatedPublishInstance);
    
                // Allocated Publishing Instance will pick up the publishing
                if (this.IsPublishingServer(myArgs))
                {
                    Sitecore.Publishing.DistributedPublishingManager.StartPublishing(myArgs);
                }
            }
    
            protected string GetPublishInstanceForUser(User user)
            {
                // Find role and allocated publishing instance
                foreach (XmlNode node in Factory.GetConfigNodes("parallelpublishRoles/role"))
                {
                    string role = XmlUtil.GetAttribute("name", node);
                    string publishInstance = XmlUtil.GetAttribute("publishinstance", node);
                    if (user.IsInRole(role))
                        return publishInstance;
                }
    
                // Return default Publish Instance
                return Settings.Publishing.PublishingInstance;
            }
        }
    
    
        public class StartPublishingRemoteEvent : Sitecore.Publishing.StartPublishingRemoteEvent
        {
            public StartPublishingRemoteEvent(Sitecore.Publishing.DistributedPublishOptions[] options, Sitecore.Handle statusHandle, string userName, Sitecore.Globalization.Language clientLanguage)
                : base(options, statusHandle, userName, clientLanguage)
            {
            }
    
            // Methods
            [Obsolete("Use StartPublishingRemoteEvent(DistributedPublishOptions[] options, Handle statusHandle, string userName, Language clientLanguage) instead.")]
            public StartPublishingRemoteEvent(Sitecore.Publishing.DistributedPublishOptions[] options, Sitecore.Handle statusHandle, string userName) :
                base(options, statusHandle, userName, Sitecore.Data.Managers.LanguageManager.DefaultLanguage)
            {
            }
            
            public void SetPublishInstance(string piName)
            {
                base.PublishingServer = piName;
            }
        }
    }
    
  9. Update your custom publish:startPublishing event in web.config with below changes
  10. <event name="publish:startPublishing">
            <!-- handler type="Sitecore.Publishing.RemotePublishingEventHandler, Sitecore.Kernel" method="OnStartPublishing" / -->
    
          <handler type="SitecoreTactics.Publishing.RemotePublishingEventHandler, SitecoreTactics.Publishing" method="OnStartPublishing" />
            
          </event>
    
       
Now try in your environment, parallel publishing is surely working for you too. If it's not working, check
  • EventQueue is disabled, enable it
  • All CM instance should have exact time. If two instances have time difference of 5 minutes, then there the instance running late will get updates of other instance after 5 minutes, so sync will never be done between them.
  • Give proper Roles Name and Publishing Instance Name in the ParallelPublish.config file.
  • Check all your Sitecore instances are pointing to same databases - master, web, core.
  • Configure the publish:startPublishing event and ParallelPublish.config on each Sitecore Instance.
  • ParallelPublish.config file should have same contents on all the instances.
  • Instance which needs to do publish should be up and running.


Now enjoy parallel publishing without waiting time, without queue stuck!

Sitecore MVP 2014 Award

Today, total 107 impeccable Sitecore community leaders around the world received the Sitecore Technology MVP 2014 Award. There are more than 10,000 certified Sitecore developers currently worldwide, and being a 2014 winner as a part of this very elite group of MVPs, gives so deep pleasant feeling and satisfaction.


Sitecore MVP 2014 award


The Sitecore MVP Award is given to exceptional technical community leaders who foster the free and objective exchange of knowledge by actively sharing their real-world expertise with technology users.

The Sitecore MVP Award celebrates the most active Sitecore community members from around the world who provide invaluable online and offline expertise that enriches the community experience and makes a difference.

For me, winning an MVP award means to become more aware of the meaning of connectivity and responsibility, and continue same kind of contribution to Sitecore community.

Invoke Sitecore Scheduling Agent Programmatically

Sitecore provides facility to run scheduled jobs at specified regular interval like DatabaseAgent, UrlAgent, etc. We created our own agent to make scheduled publishing. So, this agent is executed every one hour and starts pending publishing, which can take several minutes say 20-30 minutes.

This can be achieved by creating a scheduling agent in web.config as below:
    <agent name="ScheduledPublish" type="SitecoreTactics.Tasks.StartPublish" method="StartPublish" interval="01:00:00" />
Here, every 1 hour, Sitecore invokes the agent named ScheduledPublish and executes StartPublish method of SitecoreTactics.Tasks.PublishManager class.

Requirement to invoke Sitecore Agent

Now, we had a requirement to invoke our custom agent in between through a Web Page when user wants to do instant publish instead of waiting for next turn of its execution. Should we call our code from the web page itself or invoke the Agent directly programmatically? There was no clear idea which can be a better approach? Below are two approaches we worked on.

Wrong approach we chose earlier to execute code directly

Earlier, we called the PublishManager's StartPublish method directly from the web page, when user clicks on a button as below.
protected void btnStartPublish_Click(object sender, EventArgs e)
{
    SitecoreTactics.Tasks.PublishManager publisher = new SitecoreTactics.Tasks.PublishManager();
    publisher.StartPublish();
}
The limitation in the approach was, the code was executed by the thread of web page or a web request, which needed to be executed more than 30 minutes. But, after the Server's Script timeout (default 5 minutes), the execution was stopped every time and could not complete full job of 30+ minutes. But if same code was executed as a Sitecore Agent, it finished all execution, because Sitecore Agents are executed by separate ManagedThreadPools, which never has TimeOut until they finish job or Application ends.

Correct approach to invoke Sitecore Scheduling Agent

We searched a lot on Google about invoking Sitecore Agent. Later on, Reflector came to our help. Using it we found the code from where Sitecore invokes its agents and we implemented the same code as below:
protected void btnStartPublish_Click(object sender, EventArgs e)
{
 foreach (XmlNode node in Factory.GetConfigNodes("scheduling/agent"))
 {
  object obj = Factory.CreateObject(node, true);
  string name = XmlUtil.GetAttribute("name", node);
 
  if (name == "ScheduledPublish") // Scheduling Agent Name
  {
   string method = XmlUtil.GetAttribute("method", node);
 
   JobOptions options = new JobOptions(name, "", "", obj, method);
   options.AtomicExecution = true; // Allow multiple instances of the agent running simultaneously
   JobManager.Start(options);
 
   break;
  }
 }
}
Now, we are not worried for executing agents's code. Agent's process needs to be executed for one hour, two hours, ten hours? No worries, we can now call Sitecore Jobs programmatically!!

Custom Google Search Engine for Sitecore Technical Blogs

One day I was thinking that how difficult it is to find out technical help from thousands of blogs written on net. Finding best blogs out of them is really difficult.

There are many ways to make a collection of Sitecore Technical Blogs like Feedly, NewsBlur, InoReader, etc. But, here I have prepared a Custom Google Search Engine which has pre-built indexes for good Sitecore technical blogs and Sitecore Community.

How to access this Custom Google Search Engine for Sitecore?

Open: http://goo.gl/YzZuCm
OR
https://www.google.com/cse/publicurl?cx=003865006081614653083:n809uqjt03c

This is a Google's custom Search Engine, which gives results from selected different Sitecore bloggers, Sitecore Communities, etc.
 

Enjoy searching Sitecore stuffs easily and quickly!! 

gZip Compression removes pre-existing vary header

We had a requirement to modify Vary Response Header to 'User-Agent' for mobile site SEO for google. Have you faced a situation that your changed Vary header is not getting reflected on the Response Headers on ASP.NET webpage?

We tried to modify the header from Page_Load event of a webpage. but when page is loaded, my HttpWatch/Fiddler is not showing Vary header as 'User-Agent', it is still showing 'Accept-Encoding' instead. Checkout my code:
using System; 
using System.Collections.Generic; 
using System.Web; 
using System.Web.UI; 

public partial class _Default : System.Web.UI.Page 
{ 
   protected void Page_Load(object sender, EventArgs e) 
   { 
      Response.Write("Hello"); 

      // Modify Vary Response Header
      Response.AppendHeader("Vary", "User-Agent"); 
   } 
}
Above code failed so we also tried to append these headers at Page_LoadComplete and context_EndRequest event(last event in page life cycle) assuming that the headers were tampered in between (Between Page_Load and context_EndRequest). See below snap, showing our code not working, means showing Vary as 'Accept-Encoding' instead of 'User-Agent'. So, something strange was happening here.


How we found the cause and the solution

One thing was sure that the headers are overwritten from IIS level, because our modified headers set in context_EndRequest event(last event in page life cycle) were also getting overwritten. After spending few hours, I came to know that dynamic compression module from IIS overwrites the Vary header to 'Accept-Encoding'. Disabling this module solved our problem. Such a nasty bug it is!!

This issue is already addressed by an official patch to IIS. We can download the HotFix from Microsoft - http://support.microsoft.com/kb/2877816

After installing this HotFix, this issue is resolved!!


We can now play with Vary header along with Dynamic Content Compression module!!

Block files by MIME content type while Sitecore upload

As per Web Security best practices, while media upload in Sitecore, we should block upload of EXE, DLL, BAT, ASPX, ASP, etc. files on server. Do you think, it is enough? I think, No.

We should also block files by checking their MIME content types because someone can also upload Exe/Dll files by renaming them as Jpg or any other extension is allowed. So, this can be a serious threat too.

So, checking MIME content type is equal important as checking file extensions.

Why checking only file extension is not enough?

We implemented a module to restrict certain extensions, provided by Yuriy Yurkovsky from Sitecore Support, Prevent files from being uploaded which is working absolutely fine. Michael Reynolds also nicely presented restricting file extensions on his post Restrict Certain Extensions From Being Uploaded.

Later on, while testing for security threats, we found two issues while implementing blocking extensions.Thanks to our QA Analyst Chirag Patel for finding such nice scenarios and also shown us how it is harmful.
  1. What if I upload file as "setup. EXE" instead of "setup.EXE"? (Just add a space after dot)
  2. What if I upload file my EXE file by renaming as JPG? (Setup.JPG instead of Setup.EXE)
Yes, in both cases we were able to upload EXE contents which should be blocked by us. See below image, how EXE file uploaded as JPG behaves when client requests. This can be a serious threat to our application.

EXE file uploaded as JPG - Security Threat

For case 1, we updated the code given in above module by removing the space between dot and file extension.
For case 2, we can use below approach.

How to restrict upload of certain MIME content types

As per the case 2, users can upload EXE  files by renaming them as JPG file. So, we can block them by their content type. Let's see how we can block content types, which is equal important as blocking files by extensions.

Below can be the patch configuration file, for better understanding, I used same format as Michael Reynolds' post to restrict extensions:

Here, two kind of content types are blocked:
- application/octet-stream (Used for bin, dms, lha, lzh, exe, dll contents)
- application/zip (Used for zip content)
 
<?xml version="1.0" encoding="utf-8"?>
<configuration xmlns:patch="http://www.sitecore.net/xmlconfig/">
  <sitecore>
    <processors>
      <uiUpload>
        <processor mode="on" type="SitecoreTactics.Pipelines.Upload.CheckForRestrictedContentType, SitecoreTactics" patch:before="processor[@type='Sitecore.Pipelines.Upload.CheckSize, Sitecore.Kernel']">
          <restrictedcontentTypes hint="raw:AddRestrictedContentType">
            <!-- content types to restrict -->
            <contentType>application/octet-stream</contentType>
            <contentType>application/zip</contentType>
        </restrictedcontentTypes>
        </processor>
      </uiUpload>
    </processors>
  </sitecore>
</configuration>

You can get more content types from:
http://www.freeformatter.com/mime-types-list.html
http://www.dailycoding.com/Posts/mime_contenttypes_with_file_extension.aspx


Below can be the source code to block certain content types defined in above config file.
namespace SitecoreTactics.Pipelines.Upload
{
    public class CheckForRestrictedContentType : UploadProcessor
    {
        private List<string> _RestrictedContentType;
        private List<string> RestrictedContentType
        {
            get
            {
                if (_RestrictedContentType == null)
                {
                    _RestrictedContentType = new List<string>();
                }

                return _RestrictedContentType;
            }
        }

        public void Process(UploadArgs args)
        {
            foreach (string fileKey in args.Files)
            {
                string fileName = args.Files[fileKey].FileName;
                string contentType = args.Files[fileKey].ContentType;

                if (IsRestrictedContentType(contentType))
                {
                    args.ErrorText = Translate.Text(string.Format("The file \"{0}\" cannot be uploaded. Files with an content Type of {1} are not allowed.", fileName, contentType));
                    Log.Warn(args.ErrorText, this);
                    args.AbortPipeline();
                }
            }
        }


        private bool IsRestrictedContentType(string contentType)
        {
            return RestrictedContentType.Exists(restrictedContentType => string.Equals(restrictedContentType, contentType, StringComparison.CurrentCultureIgnoreCase));
        }

        protected virtual void AddRestrictedContentType(XmlNode configNode)
        {
            if (configNode == null || string.IsNullOrEmpty(configNode.InnerText))
            {
                return;
            }

            RestrictedContentType.Add(configNode.InnerText);
        }
    }
}

I feel, now my Sitecore application is more secured!

Show PDF Thumbnail as Icon in Content Editor

Sitecore shows PDF icon as a thumbnail, so it becomes very difficult to find out a PDF file from a big list of uploaded files. Just imagine, life would be so easy when Sitecore provides PDF thumbnails as the icons just like images!!

It is quite possible and easy to show PDF thumbnails in different dimensions just by overriding the MediaRequestHandler of Sitecore. See my earlier post, PDF Thumbnail Handler blog. You can also find PDF Thumbnail Handler on Sitecore MarketPlace.

Use of PDF Thumbnails Handler

Once the concept of PDF Thumbnail Handler is understood, we can achieve this easily. Do following:
  1. Install PDF Thumbnail Handler to your Sitecore and make it up and running.
  2. Update PDF item's Icon field. Replace ~/media to ~/mediathumb
  3. Now, check Sitecore Content Editor will show PDF thumbnails as icons.
By default PDF icons are available as below image:

Sitecore shows PDF icon as thumbnail
The Icon has value: ~/media/36C02213E38441D9BA1AA82DB86A80E0.ashx?h=16&thn=1&w=16, which will load icon of PDF which is defined in the sitecore itself.

As per PDF Thumbnail Creation Handler, by using ~/mediathumb handler by updating its value to: ~/mediathumb/36C02213E38441D9BA1AA82DB86A80E0.ashx?h=16&thn=1&w=16. See below image which shows how PDF thumbnail is shown as icon.


We can show PDF thumbnail as icon like this


 Let's make PDF thumbnails working in Content Editor

Our requirement is to show thumbnails like below image:

Show PDF thumbnails by overriding MediaProvider


Override MediaProvider of Sitecore, for that you need to do changes in web.config file.
   <!-- override Sitecore MediaProvider -->
   <mediaProvider type="SitecoreTactics.MediaProvider, SitecoreTactics"/>

Below is the code required in MediaProvider class. In the GetMediaUrl function, when the request of any PDF file is there, then replace existing ~/media/ handler with ~/mediathumb/.
namespace SitecoreTactics
{
    public class MediaProvider: Sitecore.Resources.Media.MediaProvider
    {
        public override string GetMediaUrl(MediaItem item, MediaUrlOptions options)
        {
            string mediaUrl;
            mediaUrl = base.GetMediaUrl(item, options);

            // When item is PDF and Thumbnail is requested
            if (item.Extension == "pdf" && options.Thumbnail)
                mediaUrl = mediaUrl.Replace(Config.MediaLinkPrefix, "~/mediathumb/");

            return mediaUrl;
        }
    }
}


Wow, let's enjoy easier life with PDF thumbnails in Content Editor!!

Related Posts:
- PDF Thumbnail Handler
- Sitecore HTTP Custom Handler

PDF Thumbnail Creation Handler in Sitecore

I recently published a Sitecore Marketplace module PDF Thumbnail Creater Handler. Basically it allows to generate thumbnail on-the-fly (dynamically) for the uploaded PDF in sitecore by passing width and/or height. This will allow user to request thumbnail for any height or width and the thumbnail will be stored as a media cache in Sitecore.

Requirement

Suppose user uploaded PDF in Sitecore.
  • User want to generate thumbnails of the fist page of uploaded PDF. 
  • User can choose height and/or width of thumbnails without any configurations.
  • If user replaces a new file instead of that PDF, it should serve thumbnail of newly uploaded PDF. 
  • Similarly the thumbnail URL should work if user moves/copies/deletes the PDF item.
  • Finally, the conversion process should be scalable and quick enough so it does not affect performance and the thumbnails should be cached as media cache too

Below are the outputs of same PDF but different size thumbnails: 

PDF Thumb Original
http://sitecore/~/mediathumb/Files/MyPDF.pdf
PDF Thumb Width=300
http://sitecore/~/mediathumb/Files/MyPDF.pdf?w=300
PDF Thumb Width=150
http://sitecore/~/mediathumb/Files/MyPDF.pdf?w=150

Theoretical Concept

I just thought to achieve this overriding Sitecore MediaRequestHandler. Sitecore allows to generate different sized thumbnails of uploaded image files, See how. Why should not I use the same concept to generate thumbnails from PDF? Only concern I looked was to convert PDF to JPG only, but was not that much easy. 

So, what I wanted to achieve:
 
PDF / Thumbnail Details PDF / Thumbnail Path/URL
PDF Sitecore Path /sitecore/media library/Files/MyPDF
PDF URL http://sitecore/~/media/Files/MyPDF.pdf
PDF Thumbnail URL http://sitecore/~/mediathumb/Files/MyPDF.pdf
or
http://sitecore/~/mediathumb/Files/MyPDF.jpg
PDF Thumbnail URL
Width = 100 px
http://sitecore/~/mediathumb/Files/MyPDF.pdf?w=100
PDF Thumbnail URL
Height = 200 px
http://sitecore/~/mediathumb/Files/MyPDF.pdf?h=200
PDF Thumbnail URL
Width = 100 px
Height = 200 px
http://sitecore/~/mediathumb/Files/MyPDF.pdf?w=100&h=200

How this achieved

PDF to JPG conversion can be done using GhostScript (With GPL License, which is free), which is very efficient and gives flexibility with many other options.

You can read my older post regarding Sitecore Custom HTTP Handler, I have described there in detail.

I created own Sitecore Custom Handlers (SitecoreTactics.ThumbnailManager.PDFThumbnailRequestHandler) to generate thumbnails of media(PDF) items. See below config changes this requires:
    
<configuration xmlns:patch="http://www.sitecore.net/xmlconfig/">
  <sitecore>

    <!-- Define Custom Handler -->
    <customHandlers>
      <handler trigger="~/mediathumb/" handler="sitecore_media_thumb.ashx"  />
    </customHandlers>

    <!-- Define Media Prefix -->
    <mediaLibrary>
      <mediaPrefixes>
        <prefix value="~/mediathumb" />
      </mediaPrefixes>
    </mediaLibrary>
  </sitecore>


  <!-- Define Web Handler -->
  <system.webServer>
 <handlers>
     <add verb="*" path="sitecore_media_thumb.ashx" type="SitecoreTactics.ThumbnailManager.PDFThumbnailRequestHandler, SitecoreTactics.ThumbnailManager" name="SitecoreTactics.PDFThumbnailRequestHandler"/>
 </handlers>
  </system.webServer>
</configuration>    
Handler's source code to process thumbnail and use media cache as below.
namespace SitecoreTactics.ThumbnailManager
{
    public class PDFThumbnailRequestHandler : Sitecore.Resources.Media.MediaRequestHandler
    {
        protected override bool DoProcessRequest(HttpContext context)
        {
            Assert.ArgumentNotNull(context, "context");
            MediaRequest request = MediaManager.ParseMediaRequest(context.Request);

            if (request == null)
                return false;

            Sitecore.Resources.Media.Media media = null;
            try
            {
                media = MediaManager.GetMedia(request.MediaUri);
                if (media != null)
                    return this.DoProcessRequest(context, request, media);
            }
            catch (Exception ex)
            {
                Log.Error("PDF Thumbnail Generator error - URL:" + context.Request.Url.ToString() + ". Exception:" + ex.ToString(), this);
            }

            if (media == null)
            {
                context.Response.Write("404 - File not found");
                context.Response.End();
            }
            else
            {
                string itemNotFoundUrl = (Context.Site.LoginPage != string.Empty) ? Context.Site.LoginPage : Settings.NoAccessUrl;

                if (Settings.RequestErrors.UseServerSideRedirect)
                    HttpContext.Current.Server.Transfer(itemNotFoundUrl);
                else
                    HttpContext.Current.Response.Redirect(itemNotFoundUrl);
            }
            return true;
        }

        protected override bool DoProcessRequest(HttpContext context, MediaRequest request, Sitecore.Resources.Media.Media media)
        {
            Assert.ArgumentNotNull(context, "context");
            Assert.ArgumentNotNull(request, "request");
            Assert.ArgumentNotNull(media, "media");

            if (this.Modified(context, media, request.Options) == Sitecore.Tristate.False)
            {
                Event.RaiseEvent("media:request", new object[] { request });
                this.SendMediaHeaders(media, context);
                context.Response.StatusCode = 0x130;
                return true;
            }

            // Gets media stream for the requested media item thumbnail
            MediaStream stream = ProcessThumbnail(request, media);
            if (stream == null)
            {
                return false;
            }
            Event.RaiseEvent("media:request", new object[] { request });
            this.SendMediaHeaders(media, context);
            this.SendStreamHeaders(stream, context);
            using (stream)
            {
                context.Response.AddHeader("Content-Length", stream.Stream.Length.ToString());
                WebUtil.TransmitStream(stream.Stream, context.Response, Settings.Media.StreamBufferSize);
            }
            return true;
        }

        private MediaStream ProcessThumbnail(MediaRequest request, Sitecore.Resources.Media.Media media)
        {
            MediaStream mStream = null;
            
            ParseQueryString(request);

            mStream = MediaManager.Cache.GetStream(media, request.Options);

            if (mStream == null)
            {
                string tempPath = Settings.TempFolderPath + "/PDF-Thumbnails/";

                tempPath = MainUtil.MapPath(tempPath);

                if (!Directory.Exists(tempPath))
                    Directory.CreateDirectory(tempPath);

                // Prepare filenames
                string pdfFile = tempPath + media.MediaData.MediaId + ".pdf";
                string jpgFile = tempPath + media.MediaData.MediaId + ".jpg";

                string resizedJpgFile = tempPath + media.MediaData.MediaId + "_" + request.Options.Width.ToString() + "_" + request.Options.Height.ToString();

                if (!File.Exists(jpgFile))
                {
                    // Save BLOB media file to disk
                    MediaConverter.ConvertMediaItemToFile(media.MediaData.MediaItem, pdfFile);

                    // Convert PDF to Jpeg - First Pager
                    MediaConverter.ConvertPDFtoJPG(pdfFile, 1, jpgFile);

                }

                // Resize Image
                MediaConverter.ReSizeJPG(jpgFile, resizedJpgFile, request.Options.Width, request.Options.Height, true);

                // Convert resized image to stream
                MediaStream resizedStream = new MediaStream(File.Open(resizedJpgFile, FileMode.Open, FileAccess.Read, FileShare.Read), "jpg", media.MediaData.MediaItem);

                // Add the requested thumbnail to Media Cache
                MediaStream outStream = null;
                MediaManager.Cache.AddStream(media, request.Options, resizedStream, out outStream);

                if (outStream != null)
                {
                    // If Media cache is enabled
                    return outStream;
                }

            }

            // If Media cache is disabled
            return mStream;
        }

        public void ParseQueryString(MediaRequest mediaRequest)
        {
            HttpRequest httpRequest = mediaRequest.InnerRequest;

            Assert.ArgumentNotNull((object)httpRequest, "httpRequest");
            string str1 = httpRequest.QueryString["as"];
            if (!string.IsNullOrEmpty(str1))
                mediaRequest.Options.AllowStretch = MainUtil.GetBool(str1, false);
            string color = httpRequest.QueryString["bc"];
            if (!string.IsNullOrEmpty(color))
                mediaRequest.Options.BackgroundColor = MainUtil.StringToColor(color);

            string str2 = httpRequest.QueryString["dmc"];

            mediaRequest.Options.Height = MainUtil.GetInt(httpRequest.QueryString["h"], 0);
            string str3 = httpRequest.QueryString["iar"];
            if (!string.IsNullOrEmpty(str3))
                mediaRequest.Options.IgnoreAspectRatio = MainUtil.GetBool(str3, false);

            mediaRequest.Options.MaxHeight = MainUtil.GetInt(httpRequest.QueryString["mh"], 0);
            mediaRequest.Options.MaxWidth = MainUtil.GetInt(httpRequest.QueryString["mw"], 0);
            mediaRequest.Options.Scale = MainUtil.GetFloat(httpRequest.QueryString["sc"], 0.0f);
            string str4 = httpRequest.QueryString["thn"];
            if (!string.IsNullOrEmpty(str4))
                mediaRequest.Options.Thumbnail = MainUtil.GetBool(str4, false);

            mediaRequest.Options.Width = MainUtil.GetInt(httpRequest.QueryString["w"], 0);
        }
    }
}

You can get full source code (of older version) of this module from Sitecore Marketplace.
Update:
Module available on Sitecore Marketplace contains older code, having a bug on media cache that when someone overwrite media files (using detach/attach), it was serving older thumbnail. This bug has been fixed in above code, and will be available on marketplace very soon. Meanwhile, you can download the source code (excluding DLLs) from https://drive.google.com/file/d/0B1otw7vE3rGTQmU1U1l2TTJHQTA/view?usp=sharing:

Benefits of this approach

  1. Dynamic conversion of PDF to Thumbnail when requested
  2. Allows to convert different size thumbnails
  3. Repeated thumbnails will be served from media cache.
  4. Conversion is fast using GhostScript and media cache adds more power.


Related Posts:
- Show PDF Thumbnail Icons in Content Editor
- Sitecore HTTP Custom Handler
Render Sitecore Content Item with name of language

One issue reported in Sitecore SDN forum regarding rendering an content item under Home which has name of a language. I mean, there is an item /sitecore/content/Home/uk. Now, Sitecore consider /uk/ as an language, so it will render the Home item with uk (Ukranian) language (even if uk language is not added to Sitecore Languages). Its expected behavior is to render /Home/uk item in default language itself.

See what's the issue

We have an item named uk under Home.


Now, see what happens when we access http://patelyogesh.in/uk

Sitecore content item with language name

Why this happens

StripLanguage processor in preprocessRequest pipeline checks the FilePath and extracts expected language name from it. If the FilePath contains a valid language, it will assign it to Context.

So, in our URL: http://patelyogesh.in/uk, it will get FilePath as uk. So, assumes the uk item as uk language and set it to Context Language and Home is set to Context item.

How to solve this

One solution came in my mind to write a custom processor in httpRequestBegin, which will over-write Context Language and Context Item both, using it it is possible to solve. But, as John West suggested in forum, this might be possible using StripLanguage. So, thought to implement this and yes, it solves and is easy too. We can solve this issue overriding StripLanguage processor in preprocessRequest.
<!--<processor type="Sitecore.Pipelines.PreprocessRequest.StripLanguage, Sitecore.Kernel"/>-->
<processor type="SitecoreTactics.StripLanguage, SitecoreTactics">
  <ignoreLanguages hint=”list”>
    <language>uk</language>
    <language>en-gb</language>
    …
  </ignoreLanguages>
</processor>
To override the StripLanguage, we need to modify only one function named ExtractLanguage, which extracts the language. Now, as per our requirement, as need to ignore uk and en-gb languages. So, we will not consider language when it is uk or en-gb.

Below code should be implemented for this, but it does not contain code to read above ignoreLanguages setting. Here I have hard-coded these languages for better understanding:
public class StripLanguage : PreprocessRequestProcessor
{

    // Other methods
    ......

    private static Language ExtractLanguage(HttpRequest request)
    {
        Language language;
        Assert.ArgumentNotNull(request, "request");
        string str = WebUtil.ExtractLanguageName(request.FilePath);

        // Our code starts here
        // If the found language is uk, then set it to Empty, 
        // so sitecore will consider this as no language
        if (str == "uk" || str == "en-gb")
            str = string.Empty;
        // Our code ends here

        if (string.IsNullOrEmpty(str))
        {
            return null;
        }
        if (!Language.TryParse(str, out language))
        {
            return null;
        }
        return language;
    }

    ....
    // Other methods
}
Now, see below screen, referring /Home/uk page now refers to uk page itself with en language instead of Home page with uk language.


Finally, StripLanguage worked, we might need some extra code when implementing Multisite environment!!